I am very fortunate to have access to a fully equipped machine shop at my workplace. These urns all started out as rough "as cast" billets of various types of aluminum. I start by chucking the billet in the three jaw chuck and centering it using a dial indicator gauge. Next I square the face of the billet, remove and reverse, seating the squared face against the face of the chuck. Then I turn the outer diameter, machining grooves, threads, or other surface finishes. Then using progressivley larger drills, I begin the removal of enough metal to accomodate the boring bar. Finishing with the largest twist drill in the shop, (1 7/16" M.T. for the number people!) I start in with the boring bar, a long 1" dia steel bar with a cutting toolbit on the end, protruding sideways horizontally. I then turn the inner diameter to where I want it. After boring, I cut the urn from the billet leaving the remainder in the chuck for the next step. Now I turn the end of the billet down to a step that is ~0.1" high and 0.01" smaller diameter than the I.D. of the urn. This hundredth of an inch gap translates to a 0.005" gap between the inner walls and the cover. That is sufficient to produce a satisfyingly sharp clink upon putting the cover on. This is relatively hard aluminum, singing like a rail when struck. It acknowledges your efforts to produce an exceptional fit and finish in your work. Working metal is a true pleasure when you are working with precision equipment.
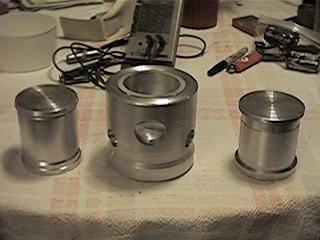
On my latest (center) creation, I've introduced clear acrylic into the equation. I like the slightly futuristic look of the machined aluminum finish contrasting with the clear inner cylinder. Kinda like a large tumbler that Arnold could've used in T2. Three are here now, but I'll add more in the future. |
|